
Google Cloud C4 Brings a 70% TCO improvement on GPT OSS with Intel and Hugging Face
- +12


Intel and Hugging Face collaborated to demonstrate the real-world value of upgrading to Google’s latest C4 Virtual Machine (VM) running on Intel® Xeon® 6 processors (codenamed Granite Rapids (GNR)). We specifically wanted to benchmark improvements in the text generation performance of OpenAI GPT OSS Large Language Model(LLM).
The results are in, and they are impressive, demonstrating a 1.7x improvement in Total Cost of Ownership(TCO) over the previous-generation Google C3 VM instances. The Google Cloud C4 VM instance further resulted in:
- 1.4x to 1.7x TPOT throughput/vCPU/dollar
- Lower price per hour over C3 VM
Introduction
GPT OSS is a common name for an open-source Mixture of Experts (MoE) model released by OpenAI. An MoE model is a deep neural network architecture that uses specialized “expert” sub-networks and a “gating network” to decide which experts to use for a given input. MoE models allow you to scale your model capacity efficiently without linearly scaling compute costs. They also allow for specialization, where different “experts” learn different skills, allowing them to adapt to diverse data distributions.
Even with very large parameters, only a small subset of experts is activated per token, making CPU inference viable.
Intel and Hugging Face collaborated to merge an expert execution optimization (PR #40304 ) to eliminate redundant computation where every expert processed all tokens to transformers. This optimization directed each expert to run only on the tokens it is routed to, removing FLOPs waste and improving utilization.

Benchmark Scope & Hardware
We benchmarked GPT OSS under a controlled, repeatable generation workload to isolate architectural differences (GCP C4 VMs on Intel Xeon 6 processors (GNR) vs GCP C3 VMs on 4th Gen Intel Xeon Processors (SPR)) and MoE execution efficiency. The focus is steady‑state decoding (per‑token latency) and end‑to‑end normalized throughput with increasing batch size while keeping sequence lengths fixed. All runs use static KV cache and SDPA attention for determinism.
Configuration Summary
- Model: unsloth/gpt-oss-120b-BF16
- Precision: bfloat16
- Task: Text generation
- Input length: 1024 tokens (left‑padded)
- Output length: 1024 tokens
- Batch sizes: 1, 2, 4, 8, 16, 32, 64
- Enabled features: Static KV cache
- SDPA attention backend
- Throughput (Total generated tokens per second aggregated over the batch)
Hardware Under Test
Create instance
C3
Visit Google Cloud Console and click on create a VM under your project. Follow the steps below to create a 176 vCPU instance.
- pick C3 in the Machine configuration and specify Machine type as c3-standard-176 . You also need to set the CPU platform and turn on all-core turbo to make performance more stable:
- configure OS and storage tab as below:
- keep other configurations as default
- click Create button
C4
Visit Google Cloud Console and click on create a VM under your project. Follow the below steps to create a 144 vCPU instance.
- pick C4 in the Machine configuration tab and specify Machine type as c4-standard-144 . You can also set the CPU platform and turn on all-core turbo to make performance more stable:
- configure OS and storage tab as we need for C3.
- keep other configurations as default
- click Create button
Set up the environment
Login the instance with SSH and then install docker. Follow the steps below to set up the environment easily. For reproducibility, we list the versions and commits we are using in the commands.
- $ git clone https://github.com/huggingface/transformers.git
- $ cd transformers/
- $ git checkout 26b65fb5168f324277b85c558ef8209bfceae1fe
- $ cd docker/transformers-intel-cpu/
- $ sudo docker build . -t <your_docker_image_tag>
- $ sudo docker run -it --rm --privileged -v /home/<your_home_folder>:/workspace <your_docker_image_tag> /bin/bash
We are in container now, do following steps.
- $ pip install git+https://github.com/huggingface/transformers.git@26b65fb5168f324277b85c558ef8209bfceae1fe
- $ pip install torch==2.8.0 torchvision torchaudio --index-url https://download.pytorch.org/whl/cpu
Benchmark Procedure
For each batch size we
- Build a fixed-length 1024‑token left‑padded batch.
- Run a single warm‑up round.
- set max_new_tokens=1024 and measure total latency, then get t h r o u g h p u t = ( O U T P U T _ T O K E N S ∗ b a t c h _ s i z e ) / t o t a l _ l a t e n c y throughput = (OUTPUT\_TOKENS * batch\_size) / total\_latency t h ro ug h p u t = ( O U TP U T _ TO K ENS ∗ ba t c h _ s i ze ) / t o t a l _ l a t e n cy .
Run numactl -l python benchmark.py for the following codes.
import os
import time
import torch
from datasets import load_dataset
from transformers import AutoModelForCausalLM, AutoTokenizer

INPUT_TOKENS = 1024
OUTPUT_TOKENS = 1024

def get_inputs(tokenizer, batch_size):
    dataset = load_dataset("ola13/small-the_pile", split="train")
    tokenizer.padding_side = "left"
    selected_texts = []
    for sample in dataset:
        input_ids = tokenizer(sample["text"], return_tensors="pt").input_ids
        if len(selected_texts) == 0 and input_ids.shape[-1] >= INPUT_TOKENS:
            selected_texts.append(sample["text"])
        elif len(selected_texts) > 0:
            selected_texts.append(sample["text"])
        if len(selected_texts) == batch_size:
            break

    return tokenizer(selected_texts, max_length=INPUT_TOKENS, padding="max_length", truncation=True, return_tensors="pt")

def run_generate(model, inputs, generation_config):
    inputs["generation_config"] = generation_config
    model.generate(**inputs) # warm up
    pre = time.time()
    model.generate(**inputs)
    latency = (time.time() - pre)
    return latency

def benchmark(model, tokenizer, batch_size, generation_config):
    inputs = get_inputs(tokenizer, batch_size)
    generation_config.max_new_tokens = 1
    generation_config.min_new_tokens = 1
    prefill_latency = run_generate(model, inputs, generation_config)
    generation_config.max_new_tokens = OUTPUT_TOKENS
    generation_config.min_new_tokens = OUTPUT_TOKENS
    total_latency = run_generate(model, inputs, generation_config)
    decoding_latency = (total_latency - prefill_latency) / (OUTPUT_TOKENS - 1)
    throughput = OUTPUT_TOKENS * batch_size / total_latency

    return prefill_latency, decoding_latency, throughput


if __name__ == "__main__":
    model_id = "unsloth/gpt-oss-120b-BF16"
    tokenizer = AutoTokenizer.from_pretrained(model_id)
    model_kwargs = {"dtype": torch.bfloat16}
    model = AutoModelForCausalLM.from_pretrained(model_id, **model_kwargs)
    model.config._attn_implementation="sdpa"
    generation_config = model.generation_config
    generation_config.do_sample = False
    generation_config.cache_implementation="static"

    for batch_size in [1, 2, 4, 8, 16, 32, 64]:
        print(f"---------- Run generation with batch size = {batch_size} ----------", flush=True)
        prefill_latency, decoding_latency, throughput = benchmark(model, tokenizer, batch_size, generation_config)
        print(f"throughput = {throughput}", flush=True)
Results
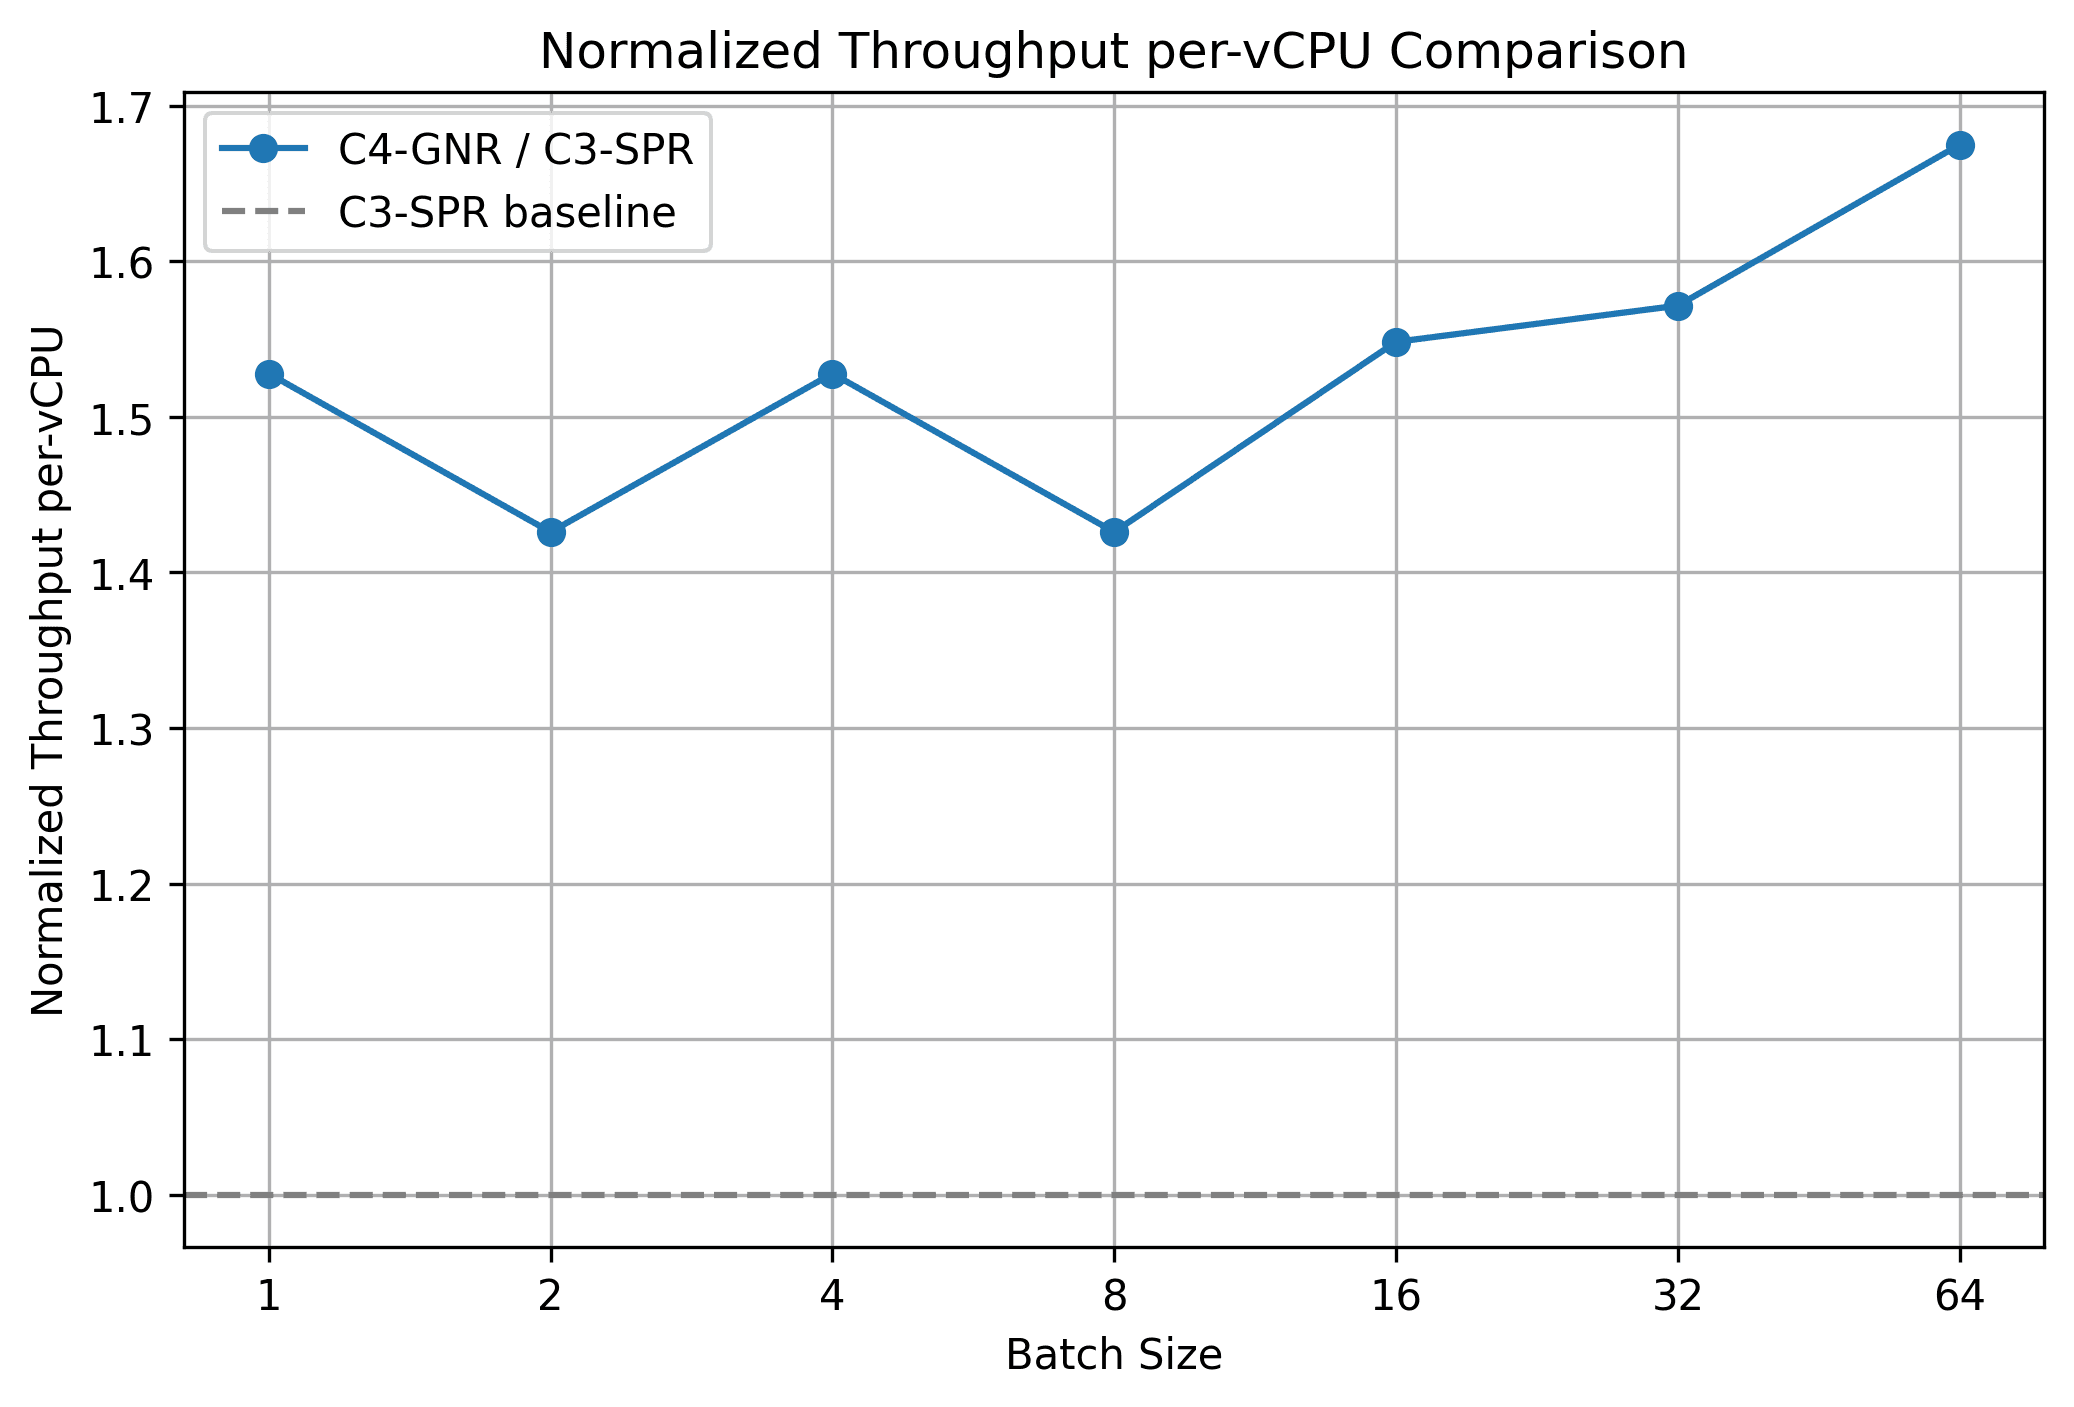
Normalized Throughput per vCPU
Across batch sizes up to 64, Intel Xeon 6 processor‑powered C4 consistently outperforms C3 with a 1.4x to 1.7× throughput per-vCPU. The formula is:
normalized_throughput_per_vCPU = throughput_C4 / vCPUs_C4 throughput_C3 / vCPUs_C3 \text{normalized\_throughput\_per\_vCPU} = \frac{\text{throughput\_C4} / \text{vCPUs\_C4}} {\text{throughput\_C3} / \text{vCPUs\_C3}} normalized_throughput_per_vCPU = throughput_C3 / vCPUs_C3 throughput_C4 / vCPUs_C4
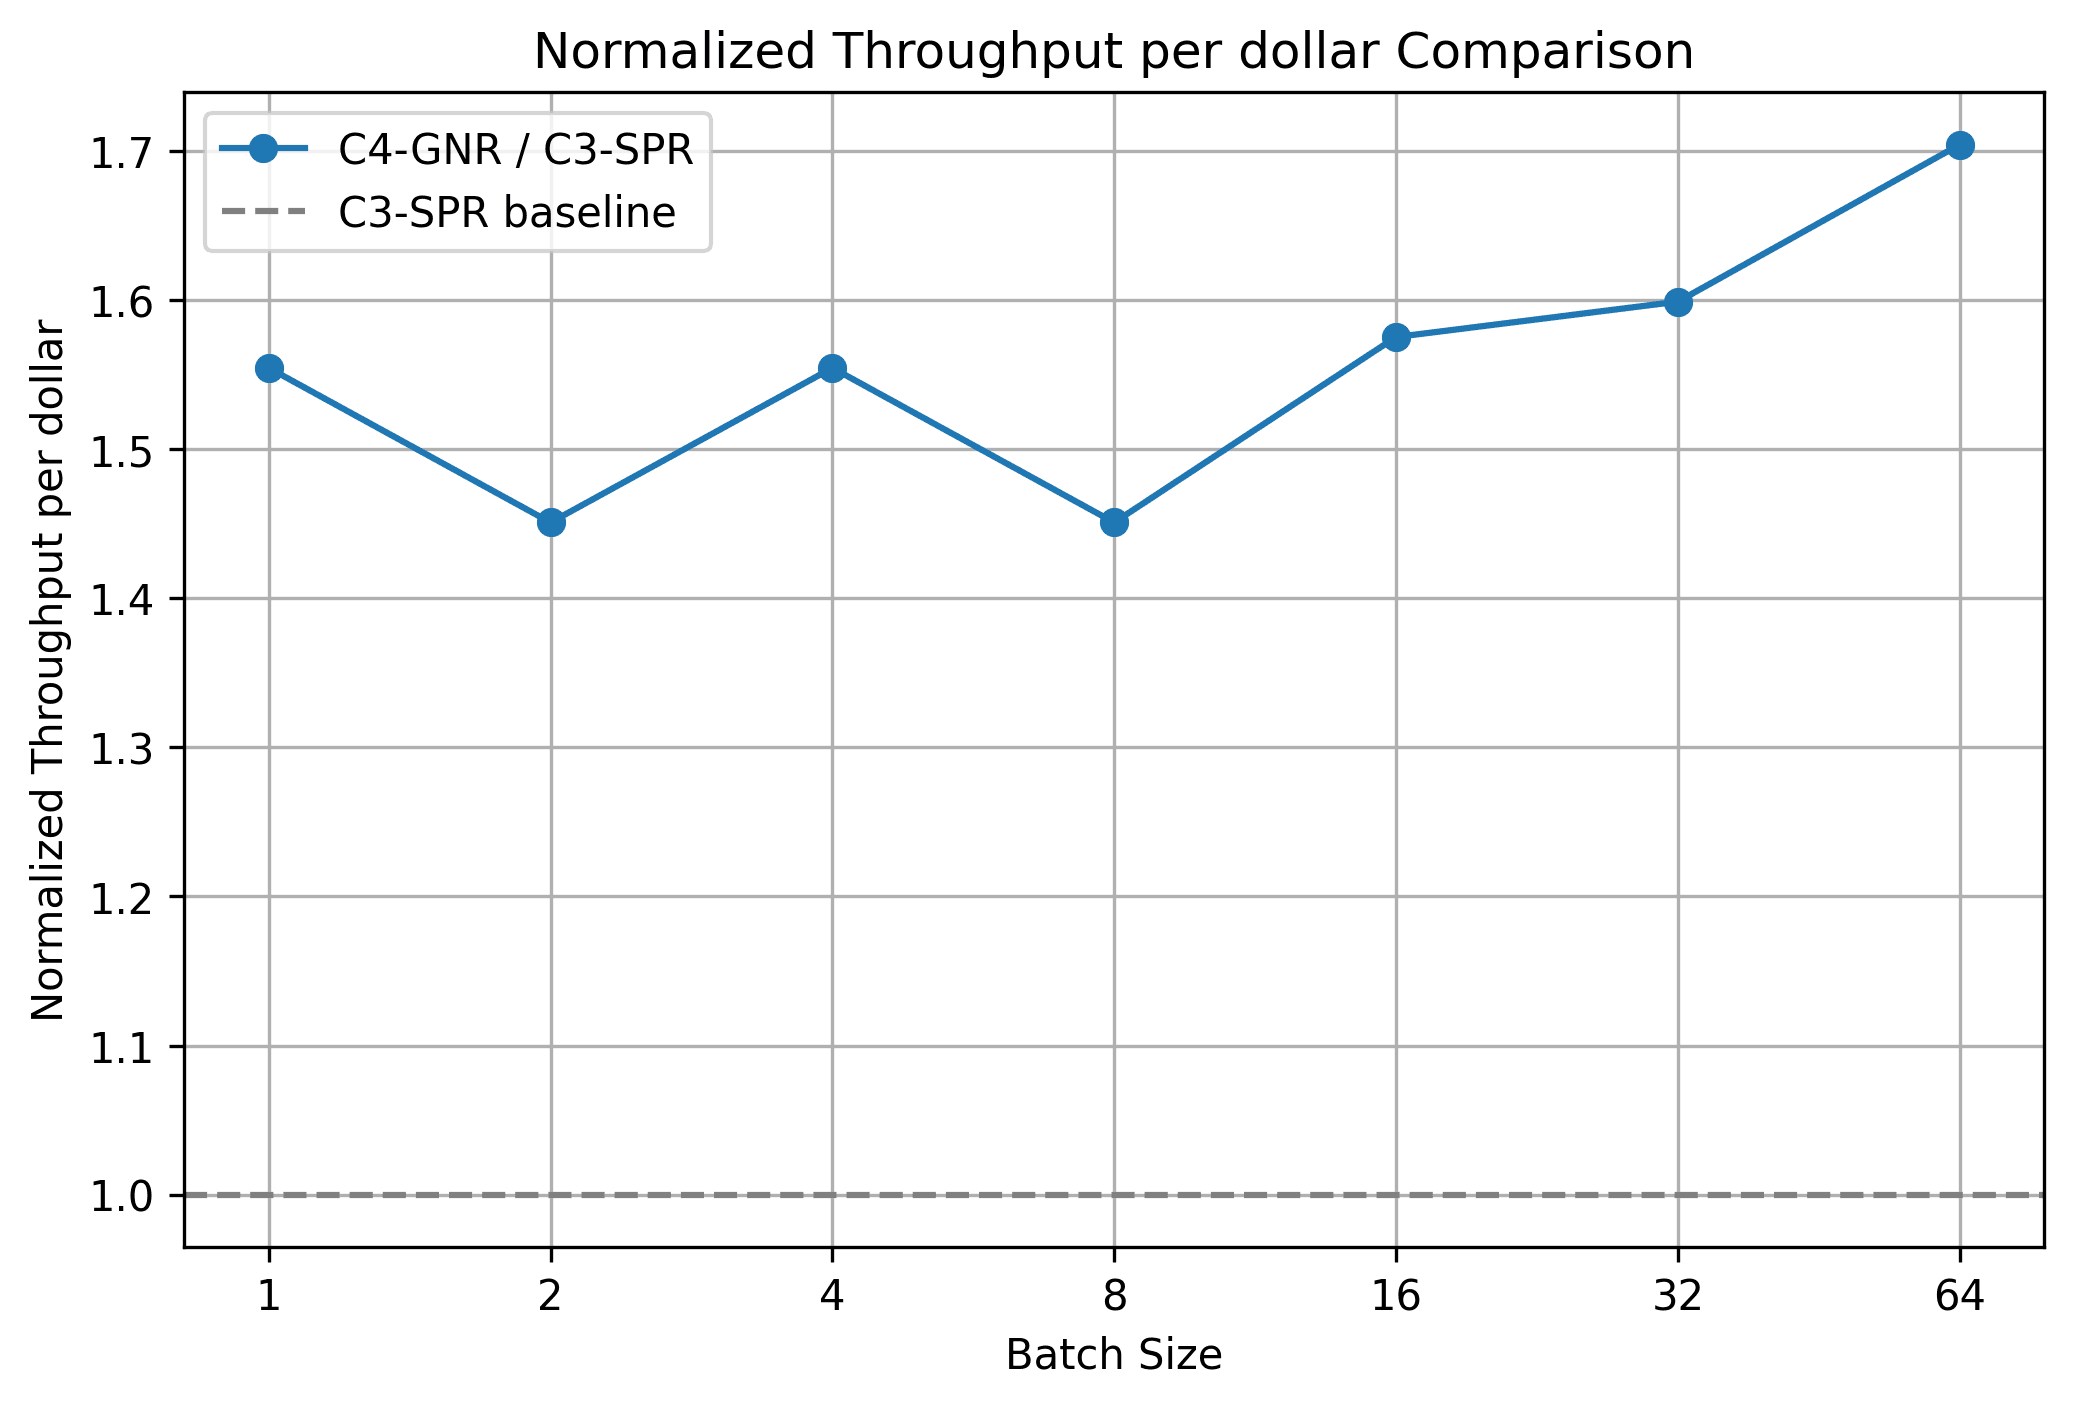
Cost & TCO
At batch size 64, C4 provides 1.7× the per‑vCPU throughput of C3 ; with near parity in price per vCPU (hourly cost scales linearly with vCPU count), this yields a 1.7× TCO advantage ( C3 would require 1.7× the spend for the same generated token volume).
Per‑vCPU throughput ratio: throughput_C4 / vCPUs_C4 throughput_C3 / vCPUs_C3 = 1.7 ⇒ TCO_C3 TCO_C4 ≈ 1.7 \frac{\text{throughput\_C4} / \text{vCPUs\_C4}}{\text{throughput\_C3} / \text{vCPUs\_C3}} = 1.7 \Rightarrow \frac{\text{TCO\_C3}}{\text{TCO\_C4}} \approx 1.7 throughput_C3 / vCPUs_C3 throughput_C4 / vCPUs_C4 = 1.7 ⇒ TCO_C4 TCO_C3 ≈ 1.7
Conclusion
Google Cloud C4 VMs powered by Intel Xeon 6 processors (GNR) provide both impressive performance gains and better cost efficiency for large MoE inference over previous generation Google Cloud C3 VM (powered by 4th Gen Intel Xeon processors). For GPT OSS MoE inference, we observed combined higher throughput, lower latency, and reduced cost. These results underline that thanks to targeted framework optimizations from Intel and Hugging Face, large MoE models can be efficiently served on next-generation general-purpose CPUs.
Models mentioned in this article 1
Datasets mentioned in this article 1
More Articles from our Blog
Welcome GPT OSS, the new open-source model family from OpenAI!
- +8
Benchmarking Language Model Performance on 5th Gen Xeon at GCP
Community
What's the y axis scale? Do we get 1.5 tok/s for a dollar/h??
· Sign up or log in to comment
- +6