
How we leveraged distilabel to create an Argilla 2.0 Chatbot
- +27


TL;DR
Discover how to build a Chatbot for a tool of your choice ( Argilla 2.0 in this case) that can understand technical documentation and chat with users about it.
In this article, we'll show you how to leverage distilabel and fine-tune a domain-specific embedding model to create a conversational model that's both accurate and engaging.
This article outlines the process of creating a Chatbot for Argilla 2.0. We will:
- create a synthetic dataset from the technical documentation to fine-tune a domain-specific embedding model,
- create a vector database to store and retrieve the documentation and
- deploy the final Chatbot to a Hugging Face Space allowing users to interact with it, storing the interactions in Argilla for continuous evaluation and improvement.
Click here to go to the app.
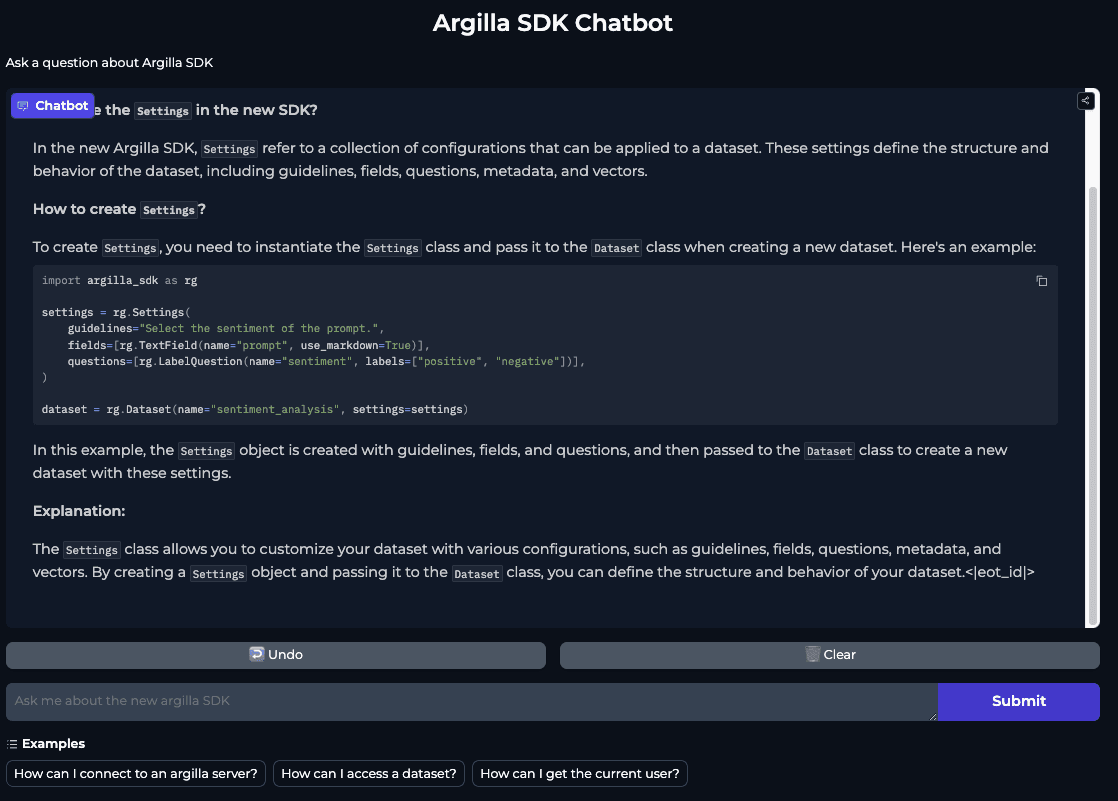
Table of Contents
- Generating Synthetic Data for Fine-Tuning a domain-specific Embedding Models
- Downloading and chunking data
- Generating synthetic data for our embedding model using distilabel
- Explore the datasets in Argilla An Argilla dataset with chunks of technical documentation
- An Argilla dataset with triplets to fine tune an embedding model
- An Argilla dataset to track the chatbot conversations
- Prepare the embedding dataset
- Load the baseline model
- Define the loss function
- Define the training strategy
- Train and save the final model
- Instantiate the fine-tuned model
- Populate the table
- Store the database in the Hugging Face Hub
Generating Synthetic Data for Fine-Tuning Custom Embedding Models
Need a quick recap on RAG? Brush up on the basics with this handy intro notebook . We'll wait for you to get up to speed!
Downloading and chunking data
Chunking data means dividing your text data into manageable chunks of approximately 256 tokens each (chunk size used in RAG later).
Let's dive into the first step: processing the documentation of your target repository. To simplify this task, you can leverage libraries like llama-index to read the repository contents and parse the markdown files. Specifically, langchain offers useful tools like MarkdownTextSplitter and llama-index provides MarkdownNodeParser to help you extract the necessary information. If you prefer a more streamlined approach, consider using the corpus-creator app from davanstrien .
To make things easier and more efficient, we've developed a custom Python script that does the heavy lifting for you. You can find it in our repository here .
This script automates the process of retrieving documentation from a GitHub repository and storing it as a dataset on the Hugging Face Hub. And the best part? It's incredibly easy to use! Let's see how we can run it:
python docs_dataset.py \
    "argilla-io/argilla-python" \
    --dataset-name "plaguss/argilla_sdk_docs_raw_unstructured"
While the script is easy to use, you can further tailor it to your needs by utilizing additional arguments. However, there are two essential inputs you'll need to provide:
- The GitHub path to the repository where your documentation is stored
- The dataset ID for the Hugging Face Hub, where your dataset will be stored
Once you've provided these required arguments, the script will take care of the rest. Here's what happens behind the scenes:
- The script downloads the documentation from the specified GitHub repository to your local directory. By default, it looks for docs in the /docs directory by default, but you can change this by specifying a different path.
- It extracts all the markdown files from the downloaded documentation.
- Chunks the extracted markdown files into manageable pieces.
- Finally, it pushes the prepared dataset to the Hugging Face Hub, making it ready for use.
To give you a better understanding of the script's inner workings, here's a code snippet that summarizes the core logic:
# The function definitions are omitted for brevity, visit the script for more info!
from github import Github

gh = Github()
repo = gh.get_repo("repo_name")

# Download the folder
download_folder(repo, "/folder/with/docs", "dir/to/download/docs")

# Extract the markdown files from the downloaded folder with the documentation from the GitHub repository
md_files = list(docs_path.glob("**/*.md"))

# Loop to iterate over the files and generate chunks from the text pieces
data = create_chunks(md_files)

# Create a dataset to push it to the hub
create_dataset(data, repo_name="name/of/the/dataset")
The script includes short functions to download the documentation, create chunks from the markdown files, and create the dataset. Including more functionalities or implementing a more complex chunking strategy should be straightforward.
You can take a look at the available arguments:
$ python docs_dataset.py -h
usage: docs_dataset.py [-h] [--dataset-name DATASET_NAME] [--docs_folder DOCS_FOLDER] [--output_dir OUTPUT_DIR] [--private | --no-private] repo [repo ...]

Download the docs from a github repository and generate a dataset from the markdown files. The dataset will be pushed to the hub.

positional arguments:
  repo                  Name of the repository in the hub. For example 'argilla-io/argilla-python'.

options:
  -h, --help            show this help message and exit
  --dataset-name DATASET_NAME
                        Name to give to the new dataset. For example 'my-name/argilla_sdk_docs_raw'.
  --docs_folder DOCS_FOLDER
                        Name of the docs folder in the repo, defaults to 'docs'.
  --output_dir OUTPUT_DIR
                        Path to save the downloaded files from the repo (optional)
  --private, --no-private
                        Whether to keep the repository private or not. Defaults to False.
Generating synthetic data for our embedding model using distilabel
We will generate synthetic questions from our documentation that can be answered by every chunk of documentation. We will also generate hard negative examples by generating unrelated questions that can be easily distinguishable. We can use the questions, hard negatives, and docs to build the triples for the fine-tuning dataset.
The full pipeline script can be seen at pipeline_docs_queries.py in the reference repository, but let's go over the different steps:
- load_data :
The first step in our journey is to acquire the dataset that houses the valuable documentation chunks. Upon closer inspection, we notice that the column containing these chunks is aptly named chunks . However, for our model to function seamlessly, we need to assign a new identity to this column. Specifically, we want to rename it to anchor , as this is the input our subsequent steps will be expecting. We'll make use of output_mappings to do this column transformation for us:
load_data = LoadDataFromHub(
    name="load_data",
    repo_id="plaguss/argilla_sdk_docs_raw_unstructured",
    output_mappings={"chunks": "anchor"},
    batch_size=10,
)- generate_sentence_pair
Now, we arrive at the most fascinating part of our process, transforming the documentation pieces into synthetic queries. This is where the GenerateSentencePair task takes center stage. This powerful task offers a wide range of possibilities for generating high-quality sentence pairs. We encourage you to explore its documentation to unlock its full potential.
In our specific use case, we'll harness the capabilities of GenerateSentencePair to craft synthetic queries that will ultimately enhance our model's performance. Let's dive deeper into how we'll configure this task to achieve our goals.
llm = InferenceEndpointsLLM(
    model_id="meta-llama/Meta-Llama-3-70B-Instruct",
    tokenizer_id="meta-llama/Meta-Llama-3-70B-Instruct",
)

generate_sentence_pair = GenerateSentencePair(
    name="generate_sentence_pair",
    triplet=True,  # Generate positive and negative
    action="query",
    context="The generated sentence has to be related with Argilla, a data annotation tool for AI engineers and domain experts.",
    llm=llm,
    input_batch_size=10,
    output_mappings={"model_name": "model_name_query"},
)
Let's break down the code snippet above.
By setting triplet=True , we're instructing the task to produce a series of triplets, comprising an anchor, a positive sentence, and a negative sentence. This format is perfectly suited for fine-tuning, as explained in the Sentence Transformers library's training overview .
The action="query" parameter is a crucial aspect of this task, as it directs the LLM to generate queries for the positive sentences. This is where the magic happens, and our documentation chunks are transformed into meaningful queries.
To further assist the model, we've included the context argument. This provides additional information to the LLM when the anchor sentence lacks sufficient context, which is often the case with brief documentation chunks.
Finally, we've chosen to harness the power of the meta-llama/Meta-Llama-3-70B-Instruct model, via the InferenceEndpointsLLM component. This selection enables us to tap into the model's capabilities, generating high-quality synthetic queries that will ultimately enhance our model's performance.
- multiply_queries
Using the GenerateSentencePair step, we obtained as many examples for training as chunks we had, 251 in this case. However, we recognize that this might not be sufficient to fine-tune a custom model that can accurately capture the nuances of our specific use case.
To overcome this limitation, we'll employ another LLM to generate additional queries. This will allow us to increase the size of our training dataset, providing our model with a richer foundation for learning.
This brings us to the next step in our pipeline: MultipleQueries , a custom Task that we've crafted to further augment our dataset.
multiply_queries = MultipleQueries(
    name="multiply_queries",
    num_queries=3,
    system_prompt=(
        "You are an AI assistant helping to generate diverse examples. Ensure the "
        "generated queries are all in separated lines and preceded by a dash. "
        "Do not generate anything else or introduce the task."
    ),
    llm=llm,
    input_batch_size=10,
    input_mappings={"query": "positive"},
    output_mappings={"model_name": "model_name_query_multiplied"},
)
Now, let's delve into the configuration of our custom Task , designed to amplify our training dataset. The linchpin of this task is the num_queries parameter, set to 3 in this instance. This means we'll generate three additional "positive" queries for each example, effectively quadrupling our dataset size, assuming some examples may not succeed.
To ensure the Large Language Model (LLM) stays on track, we've crafted a system_prompt that provides clear guidance on our instructions. Given the strength of the chosen model and the simplicity of our examples, we didn't need to employ structured generation techniques. However, this could be a valuable approach in more complex scenarios.
Curious about the inner workings of our custom Task ? Click the dropdown below to explore the full definition:
multiply_queries_template = (
    "Given the following query:\n{original}\nGenerate {num_queries} similar queries by varying "
    "the tone and the phrases slightly. "
    "Ensure the generated queries are coherent with the original reference and relevant to the context of data annotation "
    "and AI dataset development."
)

class MultipleQueries(Task):
    system_prompt: Optional[str] = None
    num_queries: int = 1

    @property
    def inputs(self) -> List[str]:
        return ["query"]

    def format_input(self, input: Dict[str, Any]) -> ChatType:
        prompt = [
            {
                "role": "user",
                "content": multiply_queries_template.format(
                    original=input["query"],
                    num_queries=self.num_queries
                ),
            },
        ]
        if self.system_prompt:
            prompt.insert(0, {"role": "system", "content": self.system_prompt})
        return prompt

    @property
    def outputs(self) -> List[str]:
        return ["queries", "model_name"]

    def format_output(
        self, output: Union[str, None], input: Dict[str, Any]
    ) -> Dict[str, Any]:
        queries = output.split("- ")
        if len(queries) > self.num_queries:
            queries = queries[1:]
        queries = [q.strip() for q in queries]
return {"queries": queries}- merge_columns
As we approach the final stages of our pipeline, our focus shifts to data processing. Our ultimate goal is to create a refined dataset, comprising rows of triplets suited for fine-tuning. However, after generating multiple queries, our dataset now contains two distinct columns: positive and queries . The positive column holds the original query as a single string, while the queries column stores a list of strings, representing the additional queries generated for the same entity.
To merge these two columns into a single, cohesive list, we'll employ the MergeColumns step. This will enable us to combine the original query with the generated queries, creating a unified:
merge_columns = MergeColumns(
    name="merge_columns",
    columns=["positive", "queries"],
    output_column="positive"
)- expand_columns
Lastly, we use ExpandColumns to move the previous column of positive to different lines. As a result, each positive query will occupy a separate line, while the anchor and negative columns will be replicated to match the expanded positive queries. This data manipulation will yield a dataset with the ideal structure for fine-tuning:
expand_columns = ExpandColumns(columns=["positive"])Click the dropdown to see the full pipeline definition:
from pathlib import Path
from typing import Any, Dict, List, Union, Optional

from distilabel.pipeline import Pipeline
from distilabel.steps import LoadDataFromHub
from distilabel.llms import InferenceEndpointsLLM
from distilabel.steps.tasks import GenerateSentencePair
from distilabel.steps.tasks.base import Task
from distilabel.steps.tasks.typing import ChatType
from distilabel.steps import ExpandColumns, CombineKeys


multiply_queries_template = (
    "Given the following query:\n{original}\nGenerate {num_queries} similar queries by varying "
    "the tone and the phrases slightly. "
    "Ensure the generated queries are coherent with the original reference and relevant to the context of data annotation "
    "and AI dataset development."
)

class MultipleQueries(Task):
    system_prompt: Optional[str] = None
    num_queries: int = 1

    @property
    def inputs(self) -> List[str]:
        return ["query"]

    def format_input(self, input: Dict[str, Any]) -> ChatType:
        prompt = [
            {
                "role": "user",
                "content": multiply_queries_template.format(
                    original=input["query"],
                    num_queries=self.num_queries
                ),
            },
        ]
        if self.system_prompt:
            prompt.insert(0, {"role": "system", "content": self.system_prompt})
        return prompt

    @property
    def outputs(self) -> List[str]:
        return ["queries", "model_name"]

    def format_output(
        self, output: Union[str, None], input: Dict[str, Any]
    ) -> Dict[str, Any]:
        queries = output.split("- ")
        if len(queries) > self.num_queries:
            queries = queries[1:]
        queries = [q.strip() for q in queries]
        return {"queries": queries}


with Pipeline(
    name="embedding-queries",
    description="Generate queries to train a sentence embedding model."
) as pipeline:
    load_data = LoadDataFromHub(
        name="load_data",
        repo_id="plaguss/argilla_sdk_docs_raw_unstructured",
        output_mappings={"chunks": "anchor"},
        batch_size=10,
    )

    llm = InferenceEndpointsLLM(
        model_id="meta-llama/Meta-Llama-3-70B-Instruct",
        tokenizer_id="meta-llama/Meta-Llama-3-70B-Instruct",
    )

    generate_sentence_pair = GenerateSentencePair(
        name="generate_sentence_pair",
        triplet=True,  # Generate positive and negative
        action="query",
        context="The generated sentence has to be related with Argilla, a data annotation tool for AI engineers and domain experts.",
        llm=llm,
        input_batch_size=10,
        output_mappings={"model_name": "model_name_query"},
    )

    multiply_queries = MultipleQueries(
        name="multiply_queries",
        num_queries=3,
        system_prompt=(
            "You are an AI assistant helping to generate diverse examples. Ensure the "
            "generated queries are all in separated lines and preceded by a dash. "
            "Do not generate anything else or introduce the task."
        ),
        llm=llm,
        input_batch_size=10,
        input_mappings={"query": "positive"},
        output_mappings={"model_name": "model_name_query_multiplied"},
    )

    merge_columns = MergeColumns(
        name="merge_columns",
        columns=["positive", "queries"],
        output_column="positive"
    )

    expand_columns = ExpandColumns(
        columns=["positive"],
    )

    (
        load_data
        >> generate_sentence_pair
        >> multiply_queries
        >> merge_columns
        >> expand_columns
    )


if __name__ == "__main__":

    pipeline_parameters = {
        "generate_sentence_pair": {
            "llm": {
                "generation_kwargs": {
                    "temperature": 0.7,
                    "max_new_tokens": 512,
                }
            }
        },
        "multiply_queries": {
            "llm": {
                "generation_kwargs": {
                    "temperature": 0.7,
                    "max_new_tokens": 512,
                }
            }
        }
    }

    distiset = pipeline.run(
        parameters=pipeline_parameters
    )
    distiset.push_to_hub("plaguss/argilla_sdk_docs_queries")
Explore the datasets in Argilla
Now that we've generated our datasets, it's time to dive deeper and refine them as needed using Argilla. To get started, take a look at our argilla_datasets.ipynb notebook, which provides a step-by-step guide on how to upload your datasets to Argilla.
If you haven't set up an Argilla instance yet, don't worry! Follow our easy-to-follow guide in the docs to create a Hugging Face Space with Argilla. Once you've got your Space up and running, simply connect to it by updating the api_url to point to your Space:
import argilla as rg
client = rg.Argilla(
api_url="https://plaguss-argilla-sdk-chatbot.hf.space",
api_key="YOUR_API_KEY"
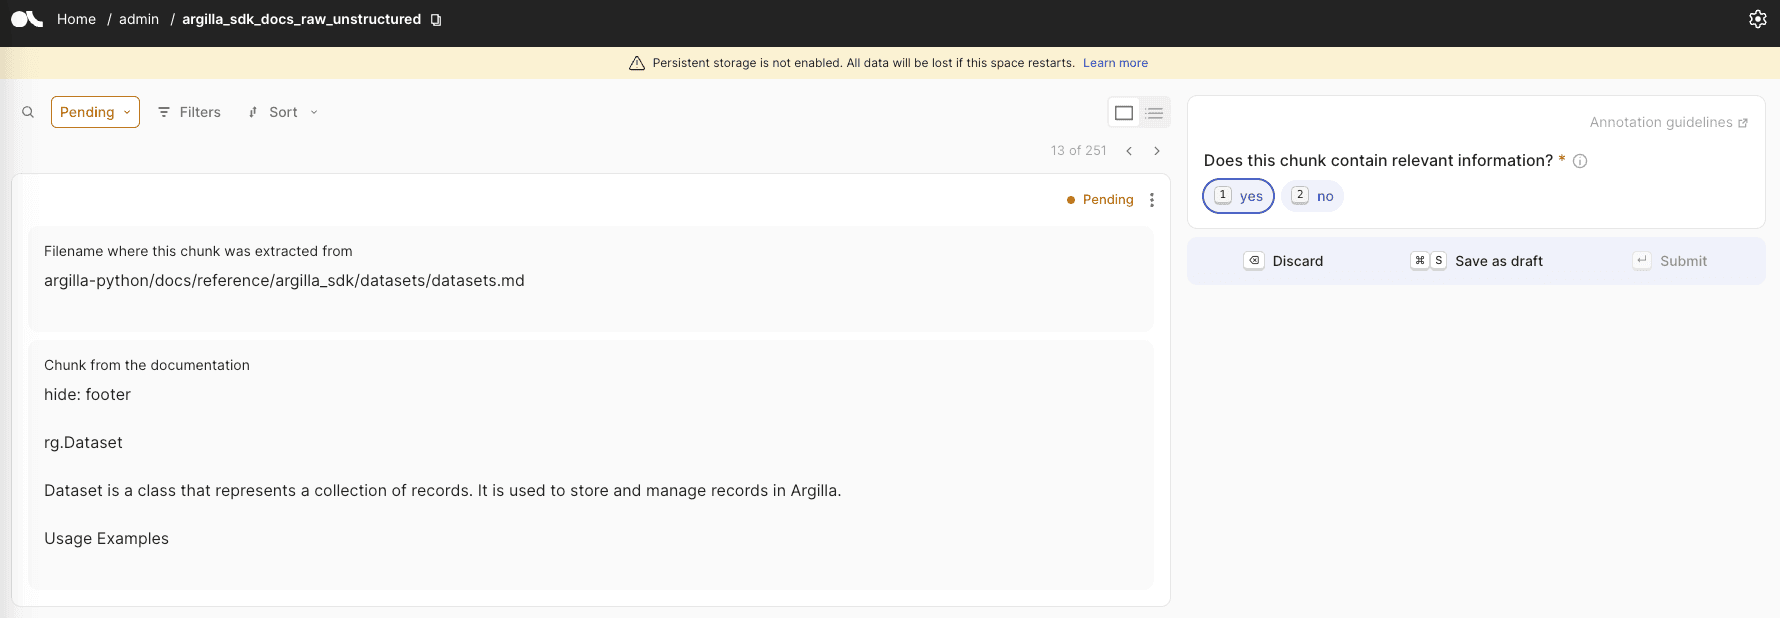
)An Argilla dataset with chunks of technical documentation
With your Argilla instance up and running, let's move on to the next step: configuring the Settings for your dataset. The good news is that the default Settings we'll create should work seamlessly for your specific use case, with no need for further adjustments:
settings = rg.Settings(
    guidelines="Review the chunks of docs.",
    fields=[
        rg.TextField(
            name="filename",
            title="Filename where this chunk was extracted from",
            use_markdown=False,
        ),
        rg.TextField(
            name="chunk",
            title="Chunk from the documentation",
            use_markdown=False,
        ),
    ],
    questions=[
        rg.LabelQuestion(
            name="good_chunk",
            title="Does this chunk contain relevant information?",
            labels=["yes", "no"],
        )
    ],
)
Let's take a closer look at the dataset structure we've created. We'll examine the filename and chunk fields, which contain the parsed filename and the generated chunks, respectively. To further enhance our dataset, we can define a simple label question, good_chunk , which allows us to manually label each chunk as useful or not. This human-in-the-loop approach enables us to refine our automated generation process. With these essential elements in place, we're now ready to create our dataset:
dataset = rg.Dataset(
    name="argilla_sdk_docs_raw_unstructured",
    settings=settings,
    client=client,
)
dataset.create()
Now, let's retrieve the dataset we created earlier from the Hugging Face Hub. Recall the dataset we generated in the chunking data section ? We'll download that dataset and extract the essential columns we need to move forward:
from datasets import load_dataset

data = (
    load_dataset("plaguss/argilla_sdk_docs_raw_unstructured", split="train")
    .select_columns(["filename", "chunks"])
    .to_list()
)
We've reached the final milestone! To bring everything together, let's log the records to Argilla. This will allow us to visualize our dataset in the Argilla interface, providing a clear and intuitive way to explore and interact with our data:
dataset.records.log(records=data, mapping={"filename": "filename", "chunks": "chunk"})These are the kind of examples you could expect to see:
An Argilla dataset with triplets to fine-tune an embedding model
Now, we can repeat the process with the dataset ready for fine-tuning we generated in the previous section . Fortunately, the process is straightforward: simply download the relevant dataset and upload it to Argilla with its designated name. For a detailed walkthrough, refer to the Jupyter notebook, which contains all the necessary instructions:
settings = rg.Settings(
    guidelines="Review the chunks of docs.",
    fields=[
        rg.TextField(
            name="anchor",
            title="Anchor (Chunk from the documentation).",
            use_markdown=False,
        ),
        rg.TextField(
            name="positive",
            title="Positive sentence that queries the anchor.",
            use_markdown=False,
        ),
        rg.TextField(
            name="negative",
            title="Negative sentence that may use similar words but has content unrelated to the anchor.",
            use_markdown=False,
        ),
    ],
    questions=[
        rg.LabelQuestion(
            name="is_positive_relevant",
            title="Is the positive query relevant?",
            labels=["yes", "no"],
        ),
        rg.LabelQuestion(
            name="is_negative_irrelevant",
            title="Is the negative query irrelevant?",
            labels=["yes", "no"],
        )
    ],
)
Let's take a closer look at the structure of our dataset, which consists of three essential TextFields : anchor , positive , and negative . The anchor field represents the chunk of text itself, while the positive field contains a query that can be answered using the anchor text as a reference. In contrast, the negative field holds an unrelated query that serves as a negative example in the triplet. The positive and negative questions play a crucial role in helping our model distinguish between these examples and learn effective embeddings.
An example can be seen in the following image:

The dataset settings we've established so far have been focused on exploring our dataset, but we can take it a step further. By customizing these settings, we can identify and correct incorrect examples, refine the quality of generated questions, and iteratively improve our dataset to better suit our needs.
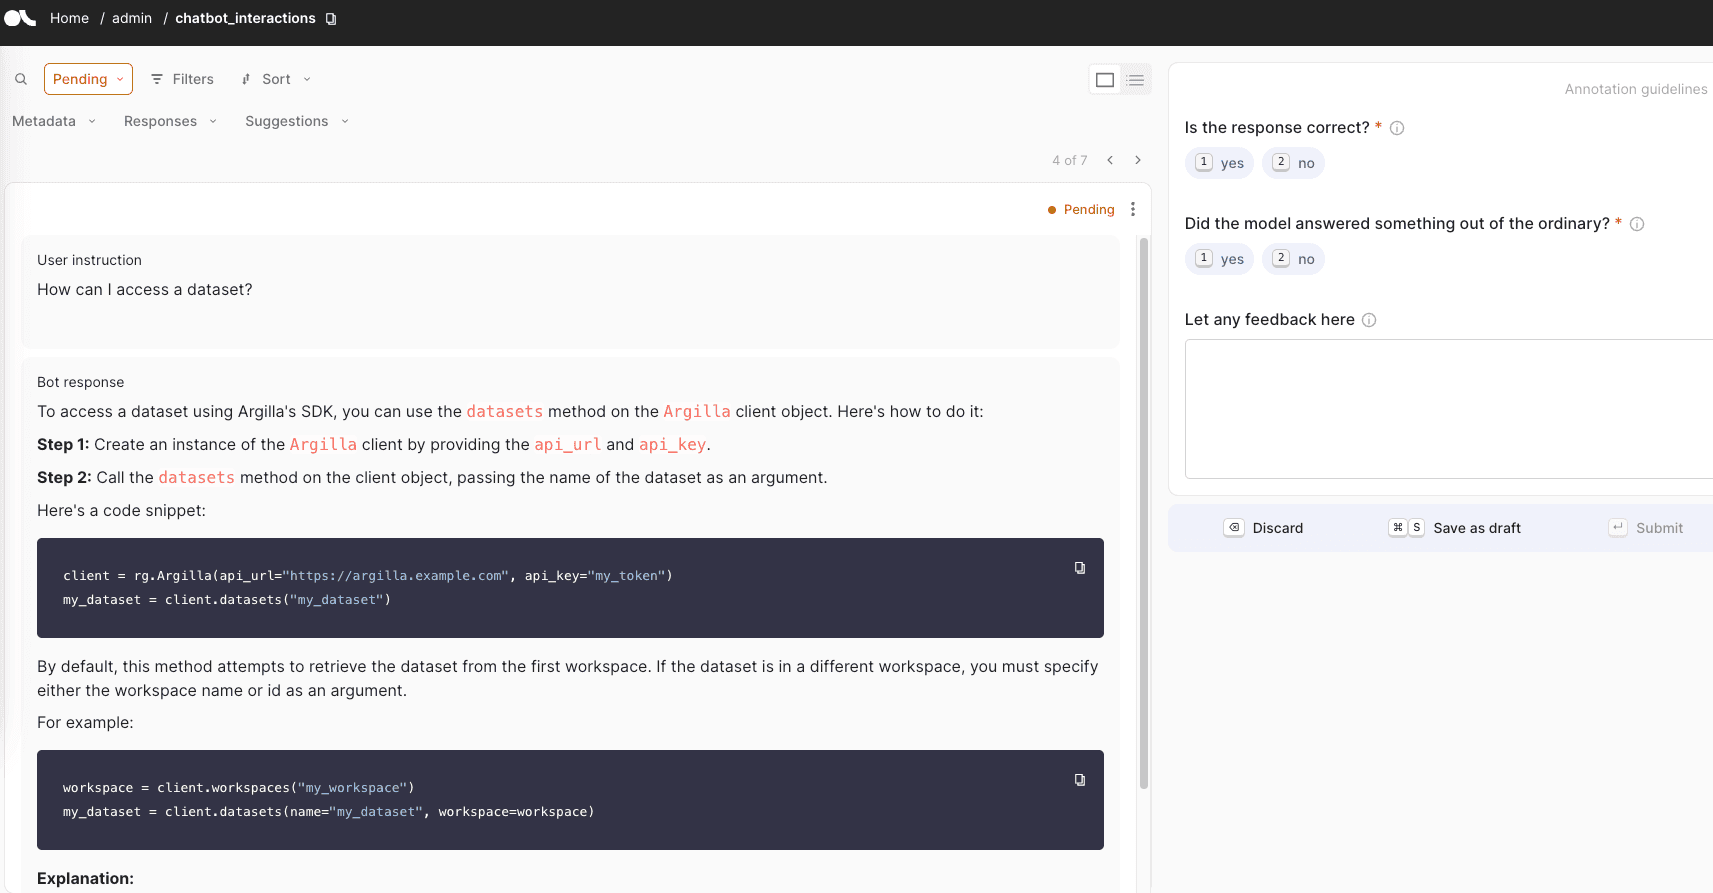
An Argilla dataset to track the chatbot conversations
Now, let's create our final dataset, which will be dedicated to tracking user interactions with our chatbot. Note : You may want to revisit this section after completing the Gradio app, as it will provide a more comprehensive understanding of the context. For now, let's take a look at the Settings for this dataset:
settings_chatbot_interactions = rg.Settings(
    guidelines="Review the user interactions with the chatbot.",
    fields=[
        rg.TextField(
            name="instruction",
            title="User instruction",
            use_markdown=True,
        ),
        rg.TextField(
            name="response",
            title="Bot response",
            use_markdown=True,
        ),
    ],
    questions=[
        rg.LabelQuestion(
            name="is_response_correct",
            title="Is the response correct?",
            labels=["yes", "no"],
        ),
        rg.LabelQuestion(
            name="out_of_guardrails",
            title="Did the model answered something out of the ordinary?",
            description="If the model answered something unrelated to Argilla SDK",
            labels=["yes", "no"],
        ),
        rg.TextQuestion(
            name="feedback",
            title="Let any feedback here",
            description="This field should be used to report any feedback that can be useful",
            required=False
        ),
    ],
    metadata=[
        rg.TermsMetadataProperty(
            name="conv_id",
            title="Conversation ID",
        ),
        rg.IntegerMetadataProperty(
            name="turn",
            min=0,
            max=100,
            title="Conversation Turn",
        )
    ]
)
In this dataset, we'll define two essential fields: instruction and response . The instruction field will store the initial query, and if the conversation is extended, it will contain the entire conversation history up to that point. The response field, on the other hand, will hold the chatbot's most recent response. To facilitate evaluation and feedback, we'll include three questions: one to assess the correctness of the response, another to determine if the model strayed off-topic, and an optional field for users to provide feedback on the response. Additionally, we'll include two metadata properties to enable filtering and analysis of the conversations: a unique conversation ID and the turn number within the conversation.
An example can be seen in the following image:
Once our chatbot has garnered significant user engagement, this dataset can serve as a valuable resource to refine and enhance our model, allowing us to iterate and improve its performance based on real-world interactions.
Fine-Tune the embedding model
Now that our custom embedding model dataset is prepared, it's time to dive into the training process.
To guide us through this step, we'll be referencing the train_embedding.ipynb notebook, which draws inspiration from Philipp Schmid's blog post on fine-tuning embedding models for RAG. While the blog post provides a comprehensive overview of the process, we'll focus on the key differences and nuances specific to our use case.
For a deeper understanding of the underlying decisions and a detailed walkthrough, be sure to check out the original blog post and review the notebook for a step-by-step explanation.
Prepare the embedding dataset
We'll begin by downloading the dataset and selecting the essential columns, which conveniently already align with the naming conventions expected by Sentence Transformers. Next, we'll add a unique id column to each sample and split the dataset into training and testing sets, allocating 90% for training and 10% for testing. Finally, we'll convert the formatted dataset into a JSON file, ready to be fed into the trainer for model fine-tuning:
from datasets import load_dataset

# Load dataset from the hub
dataset = (
    load_dataset("plaguss/argilla_sdk_docs_queries", split="train")
    .select_columns(["anchor", "positive", "negative"])  # Select the relevant columns
    .add_column("id", range(len(dataset)))               # Add an id column to the dataset
    .train_test_split(test_size=0.1)                     # split dataset into a 10% test set
)

# Save datasets to disk
dataset["train"].to_json("train_dataset.json", orient="records")
dataset["test"].to_json("test_dataset.json", orient="records")
Load the baseline model
With our dataset in place, we can now load the baseline model that will serve as the foundation for our fine-tuning process. We'll be using the same model employed in the reference blog post, ensuring a consistent starting point for our custom embedding model development:
from sentence_transformers import SentenceTransformerModelCardData, SentenceTransformer

model = SentenceTransformer(
    "BAAI/bge-base-en-v1.5",
    model_card_data=SentenceTransformerModelCardData(
        language="en",
        license="apache-2.0",
        model_name="BGE base ArgillaSDK Matryoshka",
    ),
)
Define the loss function
Given the structure of our dataset, we'll leverage the TripletLoss function, which is better suited to handle our (anchor-positive-negative) triplets. Additionally, we'll combine it with the MatryoshkaLoss , a powerful loss function that has shown promising results (for a deeper dive into MatryoshkaLoss , check out this article ):
from sentence_transformers.losses import MatryoshkaLoss, TripletLoss

inner_train_loss = TripletLoss(model)
train_loss = MatryoshkaLoss(
    model, inner_train_loss, matryoshka_dims=[768, 512, 256, 128, 64]
)
Define the training strategy
Now that we have our baseline model and loss function in place, it's time to define the training arguments that will guide the fine-tuning process. Since this work was done on an Apple M2 Pro, we need to make some adjustments to ensure a smooth training experience.
To accommodate the limited resources of our machine, we'll reduce the per_device_train_batch_size and per_device_eval_batch_size compared to the original blog post. Additionally, we'll need to remove the tf32 and bf16 precision options, as they're not supported on this device. Furthermore, we'll swap out the adamw_torch_fused optimizer, which can be used in a Google Colab notebook for faster training. By making these modifications, we'll be able to fine-tune our model:
from sentence_transformers import SentenceTransformerTrainingArguments

# Define training arguments
args = SentenceTransformerTrainingArguments(
    output_dir="bge-base-argilla-sdk-matryoshka", # output directory and hugging face model ID
    num_train_epochs=3,                           # number of epochs
    per_device_train_batch_size=8,                # train batch size
    gradient_accumulation_steps=4,                # for a global batch size of 512
    per_device_eval_batch_size=4,                 # evaluation batch size
    warmup_ratio=0.1,                             # warmup ratio
    learning_rate=2e-5,                           # learning rate, 2e-5 is a good value
    lr_scheduler_type="cosine",                   # use constant learning rate scheduler
    eval_strategy="epoch",                        # evaluate after each epoch
    save_strategy="epoch",                        # save after each epoch
    logging_steps=5,                              # log every 10 steps
    save_total_limit=1,                           # save only the last 3 models
    load_best_model_at_end=True,                  # load the best model when training ends
    metric_for_best_model="eval_dim_512_cosine_ndcg@10",  # optimizing for the best ndcg@10 score for the 512 dimension
)
Train and save the final model
from sentence_transformers import SentenceTransformerTrainer

trainer = SentenceTransformerTrainer(
    model=model,    # bg-base-en-v1
    args=args,      # training arguments
    train_dataset=train_dataset.select_columns(
        ["anchor", "positive", "negative"]
    ),  # training dataset
    loss=train_loss,
    evaluator=evaluator,
)

# Start training, the model will be automatically saved to the hub and the output directory
trainer.train()

# Save the best model
trainer.save_model()

# Push model to hub
trainer.model.push_to_hub("bge-base-argilla-sdk-matryoshka")
And that's it! We can take a look at the new model: plaguss/bge-base-argilla-sdk-matryoshka . Take a closer look at the dataset card, which is packed with valuable insights and information about our model.
But that's not all! In the next section, we'll put our model to the test and see it in action.
The vector database
We've made significant progress so far, creating a dataset and fine-tuning a model for our RAG chatbot. Now, it's time to construct the vector database that will empower our chatbot to store and retrieve relevant information efficiently.
When it comes to choosing a vector database, there are numerous alternatives available. To keep things simple and straightforward, we'll be using lancedb , a lightweight, embedded database that doesn't require a server, similar to SQLite. As we'll see, lancedb allows us to create a simple file to store our embeddings, making it easy to move around and retrieve data quickly, which is perfect for our use case.
To follow along, please refer to the accompanying notebook: vector_db.ipynb . In this notebook, we'll delve into the details of building and utilizing our vector database.
Connect to the database
After installing the dependencies, let's instantiate the database:
import lancedb

# Create a database locally called `lancedb`
db = lancedb.connect("./lancedb")
As we execute the code, a new folder should materialize in our current working directory, signaling the successful creation of our vector database.
Instantiate the fine-tuned model
Now that our vector database is set up, it's time to load our fine-tuned model. We'll utilize the sentence-transformers registry to load the model, unlocking its capabilities and preparing it for action:
import torch
from lancedb.embeddings import get_registry

model_name = "plaguss/bge-base-argilla-sdk-matryoshka"
device = "mps" if torch.backends.mps.is_available() else "cuda" if torch.cuda.is_available() else "cpu"

model = get_registry().get("sentence-transformers").create(name=model_name, device=device)
Create the table with the documentation chunks
With our fine-tuned model loaded, we're ready to create the table that will store our embeddings. To define the schema for this table, we'll employ a LanceModel , similar to pydantic.BaseModel , to create a robust representation of our Docs entity.
from lancedb.pydantic import LanceModel, Vector

class Docs(LanceModel):
    query: str = model.SourceField()
    text: str = model.SourceField()
    vector: Vector(model.ndims()) = model.VectorField()

table_name = "docs"
table = db.create_table(table_name, schema=Docs)
The previous code snippet sets the stage for creating a table with three essential columns:
- query : dedicated to storing the synthetic query
- text : housing the chunked documentation text
- vector : associated with the dimension from our fine-tuned model, ready to store the embeddings
With this table structure in place, we can now interact with the table.
Populate the table
With our table structure established, we're now ready to populate it with data. Let's load the final dataset, which contains the queries, and ingest them into our database, accompanied by their corresponding embeddings. This crucial step will bring our vector database to life, enabling our chatbot to store and retrieve relevant information efficiently:
ds = load_dataset("plaguss/argilla_sdk_docs_queries", split="train")

batch_size = 50
for batch in tqdm.tqdm(ds.iter(batch_size), total=len(ds) // batch_size):
    embeddings = model.generate_embeddings(batch["positive"])
    df = pd.DataFrame.from_dict({"query": batch["positive"], "text": batch["anchor"], "vector": embeddings})
    table.add(df)
In the previous code snippet, we iterated over the dataset in batches, generating embeddings for the synthetic queries in the positive column using our fine-tuned model. We then created a Pandas dataframe, to include the query , text , and vector columns. This dataframe combines the positive and anchor columns with the freshly generated embeddings, respectively.